Here's how to create a backup script for an app running on Lightsail to S3
« Back to overview
Backup Lightsail to S3
For our Craft CMS websites, we prefer to run them on lightsail instead of dedicated providers. It's so much faster, cheaper and more flexible.
This tech note describes how to set up backups to s3 for an app running on a lightsail instance. We prefer these over the 'image backups' since we want backups of single applications, in case we have more than one running. And it's cheaper.
This method can be used with little adjustments to backup an application running on any server to S3 of course.
What this note covers
We will:
- set up an S3 bucket for backups, with lifecycle rules for backup retention
- create an S3 IAM User/key dedicated to the Lightsail instance, and assign a policy
- install a backup script on a 'per app base' on the lightsail instance that will 'rsync' files to the s3 bucket, and dump the database
Prerequisites
- a running AWS Lightsail instance
- access to the instance as the default user (bitnami in case of a bitnami image)
- mysql rootpassword stored in a text file on your instance (~/bitnami_application_password in case of a bitnami image)
- an application
Create an S3 bucket
We'll need to have an S3 bucket to store backups on. You can either create a separate bucket per instance, or create a single bucket that contains multiple backups for multiple purposes.
To reduce management, we'll create a single bucket and name it app-backups (choose your own name).
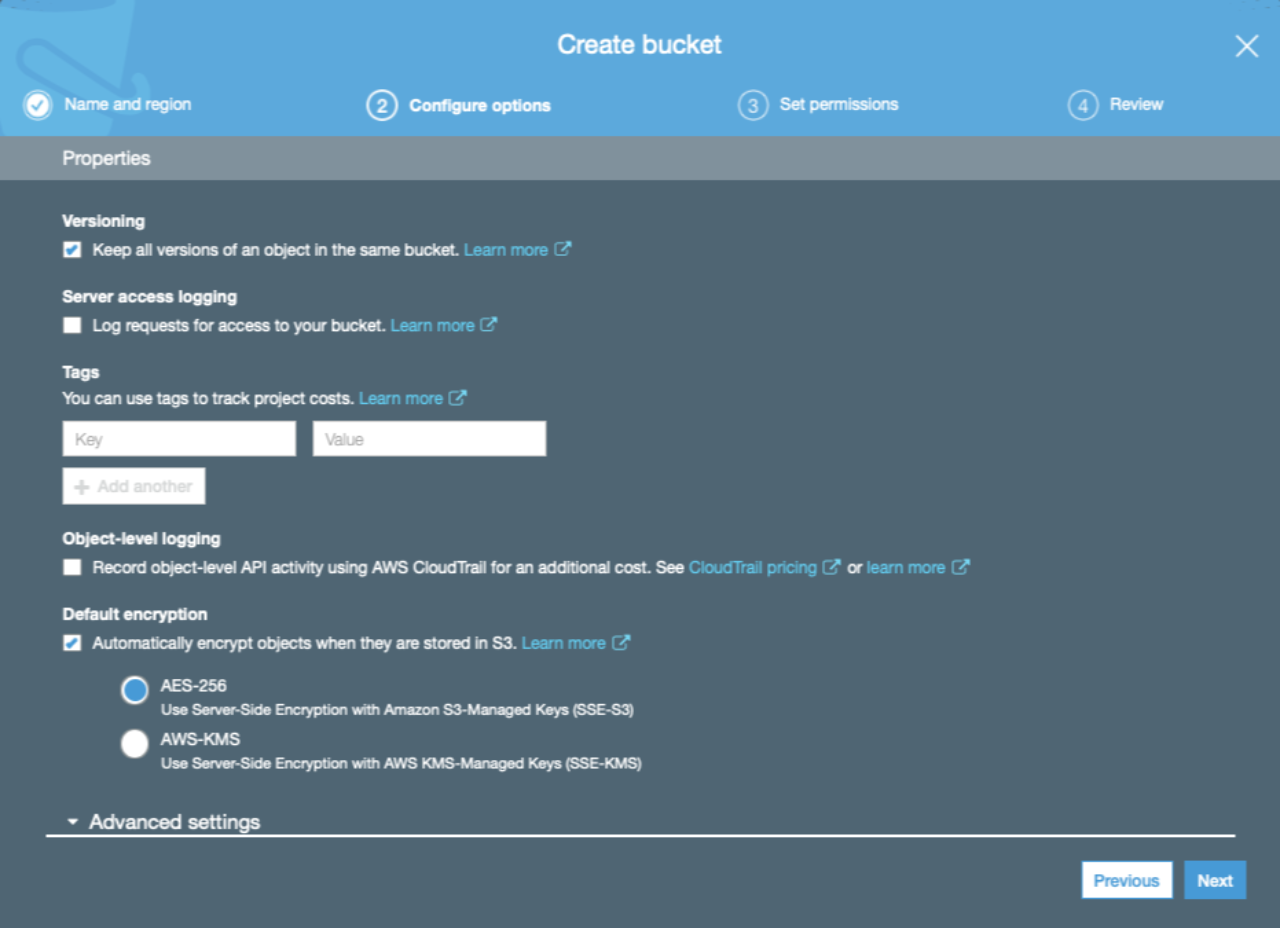
On bucket creation:
- Make sure the bucket is private
- Enable versioning - this will allow us to overwrite backups with the same name, while retaining previous backups
- Enable encryption
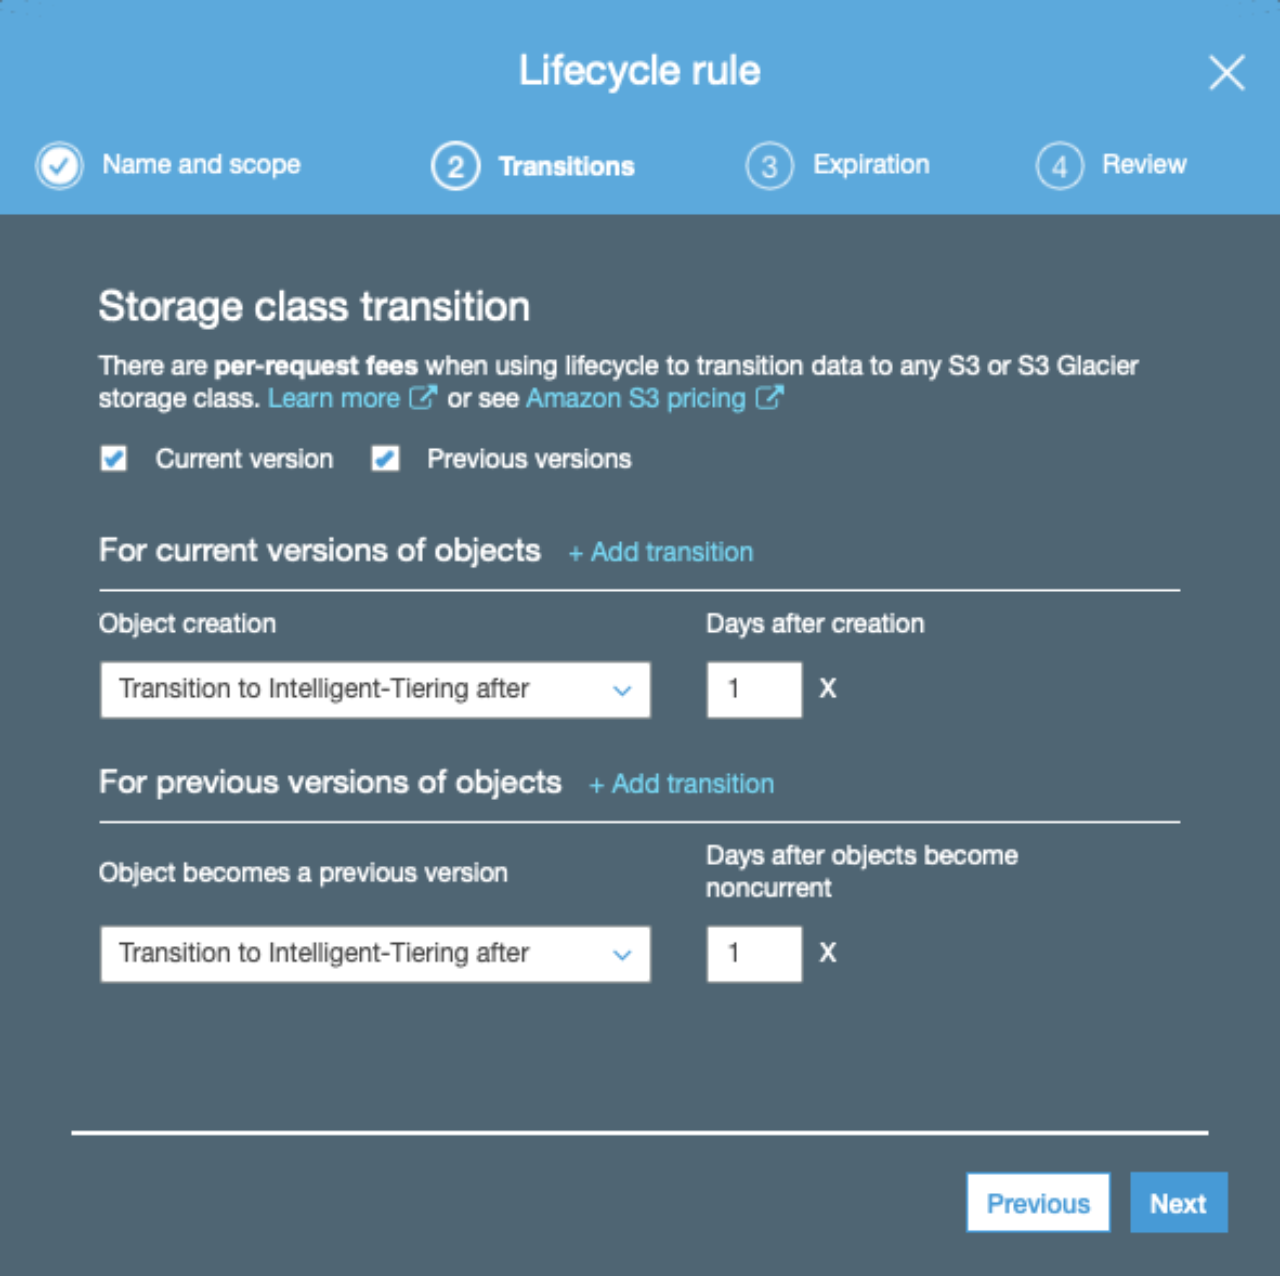
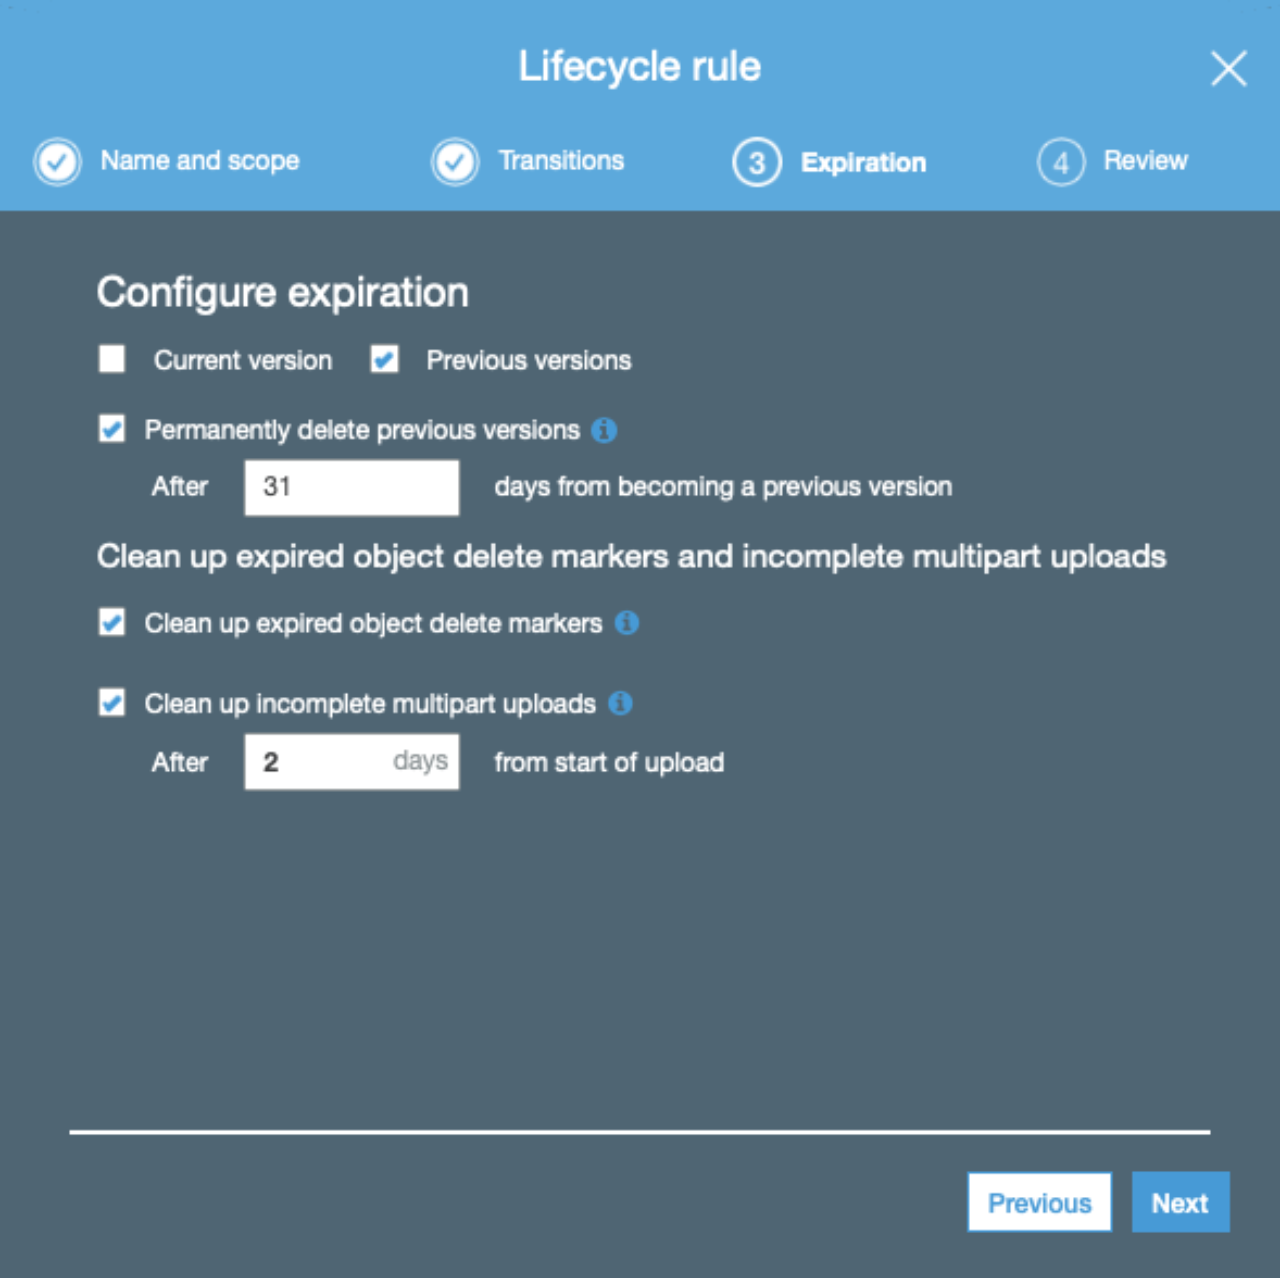
After bucket creation, create a lifecycle rule. This allows us to specify how long old backups are retained (the latest backup is always retained). We can also choose to move old backups to cheaper storage classes, such as glacier.
In this case we'll set up to automatically move old versions of files to a cheaper storage class after some days, and remove old versions completely after X days:
Then, create a folder at the root of the bucket to store backups for your client in. We'll use an alias (normalized or slugified name) for our client, and refer to it as 'CLIENTALIAS' afterwards.
Create an IAM user
Now we'll create an IAM user and allow it to write to the backup bucket. The user will be installed at the lightsail instance itself, so all apps running on the instance will have access to the resource grants. You can hand over the user to your client too, if you want, so the client can manage backups and other restricted resources by itself.
In this case, we'll create an API only user with the intention that it will give access to all resources for the client in the future, so we'll name it after the client (not the lightsail instance).
First, create a policy for your client.
We'll name it CLIENTALIAS-dobackup-clientpolicy, and it will give access to the
/CLIENTALIAS path in our bucket.
IAM policy (name:CLIENTALIAS-dobackup-clientpolicy)
{
    "Version": "2012-10-17",
    "Statement": [
        {
            "Sid": "AllowUserToSeePathInBackupBucket",
            "Action": [
                "s3:GetBucketLocation",
                "s3:ListBucket"
            ],
            "Effect": "Allow",
            "Resource": [
                "arn:aws:s3:::BACKUPBUCKETNAME"
            ],
            "Condition": {
                "StringLike": {
                    "s3:prefix": [
                        "CLIENTALIAS/*"
                    ]
                }
            }
        },
        {
            "Sid": "AllowUserToStoreObjectsInCompanyBackupPath",
            "Effect": "Allow",
            "Action": [
                "s3:PutObject"
            ],
            "Resource": [
                "arn:aws:s3:::BACKUPBUCKETNAME/CLIENTALIAS/*"
            ]
        }
    ]
}
Then, create a user with name CLIENTALIAS-instances, attach the CLIENTALIAS-dobackup-clientpolicy policy, and store the access key and secret somewhere safe.
You should test access using the aws cli with commands like:
aws s3 ls s3://BACKUPBUCKETNAME/CLIENTALIAS/
aws s3 cp ./testfile s3://BACKUPBUCKETNAME/CLIENTALIAS/testfile
(temporarily make a profile or add the credentials in AWS_ACCESS_KEY_ID, AWS_SECRET_ACCESS_KEY environment variables).
Prepare your lightsail instance
Now it's time to prepare the lightsail instance. Login with ssh as the user who should create the backups (for a bitnami image, it would be bitnami).
Make sure the aws cli is installed, we'll use pip because the apt version may err.
sudo apt install python-pip
sudo pip install awscli
and then make the aws credentials the default by entering
aws configure
on the cli and specifying the access key id, secret and region. Test again by something like:
aws s3 ls s3://BACKUPBUCKETNAME/CLIENTALIAS/
Install backup script on a per-app basis
Now we're going to install a backups script that will backup a certain directory and backup a single database.
We'll assume that the database root password is stored in ~/bitnami_application_password as raw text.
And that your app base directory is located at:
~/apps/myapp
And the latest release is located at:
~/apps/myapp/current
Place the following file in ~/apps/myapp/backup.sh:
#!/bin/bash -l
PATH="$PATH:/usr/local/bin"
set -e

# replace with your bucket name, target path and database name
S3_BUCKET=app-backups
S3_BASEKEY=CLIENTALIAS/lightsail/LIGHTSAILINSTANVENAME/APPRELEASEALIAS
DBNAME=DATABASE

declare -A FSPATHS
declare -A FSKEYS
# enter for each directory to backup, a target key for s3 and a path to upload
FSKEYS[0]=current
FSPATHS[0]=/opt/bitnami/apps/myapp/current

WORKDIR=$(dirname "$0")/backup/workdir
mkdir -p $WORKDIR
WORKDIR=$(realpath $WORKDIR)


# dump mysql db in workdir
DUMPNAME=$WORKDIR/$DBNAME.sql
DUMPGZNAME=$WORKDIR/$DBNAME.sql.gz
DUMPS3KEY=${S3_BASEKEY}/$DBNAME.sql.gz

echo "DB Backup"
echo "dumping db ${DBNAME} to ${DUMPNAME}"
mysqldump --add-drop-table --single-transaction --disable-keys=true  --quick -uroot -p"$(cat ~/bitnami_application_password)" $DBNAME > $DUMPNAME
echo "gzipping to ${DUMPGZNAME}"
gzip -cf $DUMPNAME > $DUMPGZNAME
echo "storing on S3://${S3_BUCKET}/${DUMPS3KEY}"
#aws s3api put-object --storage-class STANDARD_IA --bucket $S3_BUCKET --key $DUMPS3KEY --body $DUMPGZNAME
aws s3 cp --storage-class STANDARD_IA $DUMPGZNAME s3://${S3_BUCKET}/${DUMPS3KEY}
echo "cleaning temp files"
unlink $DUMPGZNAME

echo ""
echo "File sync"
for i in ${!FSPATHS[@]}
do
    DIR=${FSPATHS[$i]}
    S3KEY=${S3_BASEKEY}/fs/${FSKEYS[$i]}
    TARG=s3://${S3_BUCKET}/${S3KEY}
   echo "syncing dir ${DIR} to ${TARG}"
   aws s3 sync --delete --storage-class STANDARD_IA ${DIR} ${TARG}
done
echo "done"
Then make the script executable by:
chmod +x s3backup.sh
and test it by:
./s3backup.sh
Run the backup script by cron
Now we should run the backup with cron.
Do crontab -e, and don't forget to specify the shell and path. Otherwise the aws CLI may not be found.
Create a log directory in your app's directory
(mkdir ~/apps/myapp/log/)
and crontab -e:
```
SHELL=/bin/bash
PATH=$PATH:/usr/local/bin
20 4 * * * ~/apps/myapp/s3backup.sh > ~/apps/myapp/log/s3backup.cron.log 2>&1
```
Also see:
- Amazon EFS as a file system for application servers
- AWS EC2 on demand and spot prices compared
- Protect S3 buckets from deletion
- AWS Cheatsheet
- Docker memcached-alpine on AWS Docker/fargate
- Give an IAM user in account A access to Account B
- Access an AWS CodeCommit repository locally with an SSH key
- Troubleshooting CodeDeploy agent on on-premises Ubuntu 20.04
- How does an SQS message look when a payload is sent through SNS to SQS
- Unable to disable Container Insights in ECS?